| Arts and crafts in Provence : do-it-yourself ideas, handcraft, beaded jewelry, clay and crochet. |
| Salt dough |
Salt dough recipe | Crochet pattern |
Sewing notions |
Cross Stitch pattern | Kid craft idea | Arts N crafts links | Exchange Banners |
|
Salt dough : my little tips concerning all the stages baking sanding painting varnishing It is a question simply here of making you benefit from my experiment. It is while modelling and while painting your own patterns that you will discover how it's funny. The salt dough recipe
Then, incorporate water until forming a large ball.. Knead dough for a long time on a worktop a little bit floured .
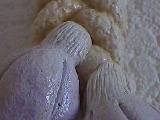
Salt dough Modelling To know: for worked objects, it is necessary to count from 1 to 2 hours of modelling. It is thus necessary to have a little time in front of oneself!
Essential tools: :
I cover my plate with the furnace of a greaseproof paper sheet and I deposit modellings progressively there. For the most fragile modellings, not to be likely to damage them by moving them of the scheme of work to the plate, I place a piece of greaseproof paper sheet on my scheme of work which I make then slip on the plate. A thick modelling cooks with difficulty. From where easy way:
Hanging I use
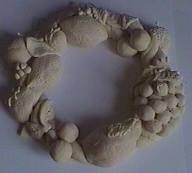
Conserving A surplus of paste can be can be preserved in a well closed bag of congelation. Several days after, a kneading is enough to return to the paste a flexible texture. With the remainders of pastes, I make small accessories (baskets, umbrellas), musical instruments (violins, quadrants) and small quite round heads in which I insert a spade out of wooden. I make them cook with my other modellings. Ideally, I will benefit from it another day in new modellings: in practice, it is my son who generally benefits from it! The interest is to have accessories and heads of hard characters thus easier to integrate in modellings. Salt dough Baking Duration: from 3 to 4 hours with 100° in my furnace with revolving heat by filling two or three grids of the furnace.
Sandpapering This stage is useful for a perfect completion. Sandpapering is carried out with the very fine sandpaper and makes it possible to remove the tiny asperities (painting will be only more beautiful) and to smooth the edge of modelling (especially if this one were made with the greaseproof paper). Painting Acrylic painting for wood or fabrics is appropriate very well.
Varnishing There, the pleasure is only in the fact that modelling is soon ready to decorate my walls... the task is ungrateful but essential to protect at the same time from dust and moisture. Two to three layers are even necessary and this of the two faces. I use a varnish for wood "which does not yellow". Chechmate or brilliance : it is according to the required effect. 24 hours after... the result is there! |
| Home |
Salt dough |
Salt dough recipe | Crochet pattern |
Sewing notions |
Cross Stitch pattern | Kid craft idea | Arts N crafts links | Exchange Banners |
 |